About Dash
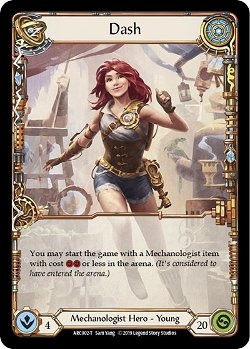
Dash is a hero of the Mechanologist class, being the only viable option in this class currently, at least from a more competitive approach. She was released in the Arcane Rising set, and her gameplay is based on two mechanics: the use of item type cards and Boost cards.
Dash's ability allows us to start with a 2-cost or lower item in the arena. The item is placed in the arena at the same time we reveal the equipment we'll use in the match.
The boost ability, present in most cards of this class, allows the player to place the card on the top of their deck in the banished zone. In case they are of the Mechanologist type, the card played gets Go Again, allowing great sequences of attacks, but at the cost of cards in your deck.
Decklist and Game Plan
The list above is the one I usually bring to Armory events, and I have been quite satisfied with it. However, there are several alterations which can be done according to the taste of the player. But before going into these details, let's discuss what's considered the core of the deck.
Firstly, we have the item choice:
Dash's gameplay is defined mainly by the item you place in the arena at the start of the game. Unfortunately, there are only three common viable items in Commoner: Hyper Driver (1) in its three colors, Dissipation Shield and Optekal Monocle.
Fortunately, Hyper Driver (1) is an excellent aggressive item, and we can use it with no other concerns in our hearts. Creating resources from the first boost effect in the turn makes it easier to create turns with extensive combat chains.
Hyper Driver is available in all three colors, changing the number of counters that start on the battlefield. Red starts with three, yellow with two, and blue with one. This way, it is very important to use red, as we want it to stay on board long enough to gain tempo in the match.
Having this in mind, I like using the three colors of the card Crankshaft (1). Its text is the following:
"When Crankshaft is banished to pay a boost cost, put a steam counter on a Hyper Driver you control".
The idea is simply keeping Hyper Driver on board for longer, and you'll hardly use this card for the attack. In case you draw it, it usually becomes your source for pitching, except the red one, which can still be used for an attack with an acceptable ratio, of 5 attack for two resources.
Besides Crankshaft, we'll also use the card Jump Start (1). As long as Hyper Driver is on board, it becomes a Zipper Hit, one of the main Dash cards in all formats. One resource to hit for 5 with Go Again is something considerably strong.
That being said, there are some reasonable lists which change the number of Crankshafts and Jump Starts in the deck, as games always end up taking longer and the player ends up considering that it's not worth using them, because, if Hyper Driver was destroyed, after removing the last counter, they become relatively weak cards. Particularly, I think the initial gas they can give you ends up making up for their downsides at the end-game, and, the more copies of them in your deck, the more chances of taking advantage of the early game.
The Deck's Core
Besides the Hyper Driver package, we have the set that basically every aggressive Dash list (including other formats) opt to use: the three colors of Zero To Sixty (1), Zipper Hit (1) and Throttle (1).
The three cards have a good cost-to-attack ratio, being one of the main reasons for Dash being so strong in Commoner. Being able to start a turn attacking for 4, Go Again, at zero cost, and activate Hyper Driver without spending any other resources, is very strong.
Here, blue ones will still be used for pitching most of the time; however, they can all be used for attacking, and also get a reasonable amount of damage in. It is important to remember that Dash's deck is one of the few that gets to see the second cycle of cards during the match, as, throughout her attacks, you lose the card on your topdeck, due to the Boost mechanic.
So, it is always nice to pay attention to how many blues you'll be placing at the bottom, when pitching; otherwise you might have a second cycle very weak in power. Against aggressive decks, you'll probably not have to reach the spot of having to worry about that, but, against defensive decks, it is a valid concern.
The Big 2-Cost Threats
We're seeing now what is most likely the most flexible part of the deck. You can change the number of copies according to the player's taste and which meta you expect to face, but I believe the list presented here has the best starting point.
Firstly, we have the set of red Combustible Courier (1) and blue Combustible Courier (2). This is a Boost card which, when it hits, the next attack with Boost in the combat chain gets +3 power.

Its red version has 4 power, which is an interesting number, as almost always your opponent will feel forced to block with a +1 equipment card, and sometimes even two cards, being possible to have a full block using only one card only when it is a defense reaction. But, if that's the case, it will already be doing its job.
The blue version has way less power, attacking only with two, but it still threatens +3 power for the next Boost card, being a very strong threat in endgame, and forcing weird blocks.
Combustible Courier is, without a question, the best chain starter in the deck, besides being the best target for the deck's gloves, Goliath Gauntlet.

Of Combustible is the best chain starter, we have as the best chain closer Overblast (1). This card will easily hit 7 damage for 2 resources, but, without Go Again. Which isn't an issue, as it, usually, will be the last attack in the turn.
Besides Overblast, we also have one copy of a red Payload (1), and one copy of a blue Payload (2), to finish the combat chains, and the game.
Payload, when attacking in a combat chain which got a Boost, gets the Dominate ability. Dominate doesn't let your opponent block using more than one card in hand.
Payload is an excellent finisher, as it catches the opponent off guard, and when used late game, is almost certain to hit its 3 damage, being lethal even when the opponent still has many cards in hand to defend themselves.
The blue payload unfortunately only has 4 attack, but, in my experience, players with approaches which are too defensive frequently get to one health and try to fatigue you out, which makes 4 health enough to finish the game in those cases.

Besides that, we also have the card Over Loop (1). It doesn't have the qualities of others mentioned in this topic. Five attack, with 2 cost, leaves it at the same level of Crankshaft, which is, you'll rarely be happy to use it.
However, we already have two weapon options that serve as chain-closers, so placing another red Payload in this spot ends up creating some weird hands, which end up leaving you with very little Boost. Besides that, Over Loop's on hit effect ends up helping you against fatigue. It is a flexible slot, but it works.
Equipment
Now that we have taken a look at the deck, we can look at equipment and understand a few choices.
Starting with the weapon choices. In Commoner, we opt to leave aside Plasma Pistol and use Plasma Barrel Shot. The pistol, Dash's signature weapon, is an excellent card when we have High Octane available and also other kits which favor it, such as Induction Chamber. However, without them, paying 1 to deal 2 isn't that attractive.
The ratio of Plasma Barrel Shot is the same. Ideally, you spent 2 resources to place your steam counter, and you'll attack when you have a combat chain with at least 3 Boost, to deal 4 damage. However, 4 damage is much more complicated to block than 2, being very useful for situations in which the opponent is almost down. Besides, it represents more damage than the pistol in a single turn.
For these reasons, it ends up being the best weapon choice for when we're just starting out a match.
In case we go second, we'll use Talishar, the Lost Prince. This weapon hits for four, every time you pay two, but it can only hit three times. You usually don't need any more than that.
The reason you change weapons according to who starts first is because you need to set up Barrel Shot. So it hits the same 4 damage as Talishar, you need to have attacked 3 times with a Boost in the turn, which is very unlikely to happen, in case you have to pay two resources to place its counter. So, Barrel Shot will be used when we have time to prepare a "small" turn and a "big" turn. On the small turn, we'll place its counter.
And, specifically on the first turn, we won't do any attacks. The opponent defends for free on the first turn, as they also draw at the end, and this way you'll lose a Hyper Driver counter and a card in your deck.
Like so, the best to do is to filter your hand, place a counter on Barrel, one card in the arsenal and pass.
Now the part that creates the most questions: Why Vest of the First Fist and not Heartened Cross Strap? Heartened is a chest that has an action. This action makes you destroy the chest and reduce the cost of the next card by two. Vest has an ability which has as a trigger hitting an attack. In case you hit, you can destroy the vest and create two resources.
The question regards the justification of using a conditional card instead of an unconditional one. There are a few reasons.
The main one being: one breaks the combat chain and the other one doesn't. Firstly, it is important to remember that every time you do an action which isn't an attack, the combat chain is closed. That is relevant, because many of our cards care about the combat chain.
Overblast, Plasma Batter, Combustible Courier and Payload: they all need the combat chain to keep going.
You can even use the chest's ability before starting the combat chain, but with that, another one of its problems shows up.
If you burst Heartened Cross, your next attack has to be a 2-cost to take the most advantage out of its cost reduction, but Overblast and Payload never want to be the first card in the combat chain. Besides, it also doesn't allow you to use your weapons.
The only drawback to Vest would be depending on some damage getting through, but, the reality is that, if your opponent is blocking in a way that always prevents damage, you're probably staying ahead, as the deck has many cards with complicated breakpoints (cards with 4 power, for instance).
The rest of the equipment isn't much of a mystery: Goliath Gauntlet is an excellent card for aggressive decks with heavy cards. Remember to only use it at the start of the combat chain, as activating it after a few attacks can remove Payload's Dominate or reset Overblast's countdown.
Achilles Accelerator are the best boots for Dash, as, besides it preventing an extra attack, without the need for a Boost, in some key turn, it also has Arcane Barrier 1.
Hope Merchant's Hood prevents you from getting locked down in some turn with too many blues or reds.
This is the standard Nullrune kit for Wizards.
Broad Tips
Here are some broad tips:
- You're not obligated to Boost. If it's your last attack in a turn, simply attack without Go Again.
- Remember that placing a counter on Plasma Barrel Shot is an action. If you do a sequence of 2 Boosts and only then place the counter, you'll break the combat chain, and it will hit only 1.
- Against aggressive decks, usually, you're the faster one. Don't be afraid to take damage. Winning with 1 or 10 health, the victory is the same.
- Against defensive decks, there is a real concern about being fatigued (running out of cards in your deck). In these situations, try to take turns between small and big turns, so you don't lose time in the match and can also have turns which deal a lot of damage.
- Against Wizards, I like bringing two Nullrunes. You'll rarely pay the three resources, as it is usually possible to compete to kill them faster, but I like having the liberty of breaking the boots.
- Against Runeblad, usually bring one of the Nullrunes and avoid breaking these boots. Runechants count as individual damage, so it is possible to only use Achilles, but they usually use Rosetta Thorn.

- If you think the match is going to take some time, don't be afraid of using Barrel Shot, even if you're second to play.
- Some heroes might have different approaches, depending on how they're built. Ira might be too aggressive or have a build which is ready to bring you to fatigue, for instance. So, keep an eye out also for your opponent's posture, and not only for their hero's main archetype.
Final Words
Commoner is a very interesting format to begin playing Flesh and Blood, and for testing out heroes at a more reasonable price. Though you rarely get the same feeling of these heroes' versions in Classic Constructed or Blitz, Commoner can get you a broad idea of the deck and its gameplay. For that reason, it is a format which I strongly recommend.
I hope you can take advantage of this guide. This is a hero which doesn't need much to bring good results, but making the most of her requires a lot of practice.
See you in the next article!






— Kommentare 0
, Reaktionen 1
Sei der erste der kommentiert